Deploying Your Django React App to Elastic Beanstalk

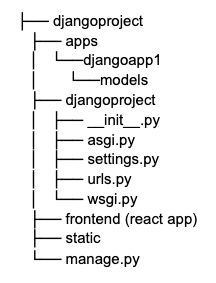
In this post I will be explaining the steps to deploy a Django React app to the AWS Elastic Beanstalk 64bit Amazon Linux 2 platform. Please be aware that the Linux 2 platform set up is wildly different from that of the previous platform, so this post will not help you if you are using a past platform. Additionally, we will be deploying the whole app (Django backend and React frontend) on the same instance*, so you will want to make sure your project is structured more or less as follows:

Prerequisites:
- Install the Elastic Beanstalk cli and connect it to your AWS account. Instructions here.
Tips for following along:
- Using ssh to explore the file structure of your environment is endlessly useful for troubleshooting issues.
- You can find your deployed root directory at: /var/app/current
Some helpful error logs to dig into:
- server error logs: /var/log/nginx/error.log
- command logs: var/log/cfn-init-cmd.log
- general deploy logs: var/log/eb-engine.log
Searching error logs:
- You can scroll through error logs with the `less` command. Ex: less eb-engine.log
- You can search for a keyword in a log with the `grep` command. Ex: grep "keyword" eb-engine.log
1. Create your app
From the command line:
- cd [my project directory]
- eb init -i
This will take you through a stream of set up questions that will ask you to choose your:
- region: it's best practice to pick the region closest to you
- app name: project name
- repo name: project name
- language: Python
- platform: Python 3.7 running on 64bit Amazon Linux 2
Then it will ask you if you want to set up the following:
- CodeCommit (no, not for the purpose of this post)
- Ssh (yes, troubleshooting is much easier if you can ssh into your environment)
2. Create your environment
From the command line:
- cd [my project directory]
- eb create -i t2.micro (I chose t2.micro because it is one of the smallest instances you can use and thus one of the cheapest. Feel free to explore other instance types here)
You will be taken through another stream of set up questions including:
- environment name (ex. projectname-staging)
- load balancer: classic is fine
Once you're done, you can open your environment instance in the browser by running:
- eb open [environment name]
3. Review the Elastic Beanstalk deployment Process
Your deploys are tied to your commits. This means that you must commit a change locally before `eb deploy [environment name]` will deploy that change.
When you deploy a change to your environment, the changes are made in the order depicted by the chart below. It probably won't make sense to you now and that's okay. As we create commands, container_commands and hook scripts it will be helpful to refer back to the chart to understand when and where they are running.


* predeploy hooks make changes is /var/app/staging

4. Tell elastic beanstalk where to find wsgi and settings files
Create a directory named .ebextensions in your root directory and put a file called django.config inside. Add the following lines to direct Elastic Beanstalk to your wsgi.py and settings.py files so that it can serve your Django app:
4. Install Node
Add the following commands to your django.config file to download, install and update node. Make sure that the node download version is compatible with your linux distribution* (the example works for centos).
* You can check your environment's linux distribution by sshing into your environment and running a command, like so:
- eb ssh [environment name]
- cat /etc/*-release
5. Install Requirements
To install the python requirements, add the following command to container_commands in the django.config file. The command will start the virtual env and run pip install on the requirements.txt file. It is important that the command is placed in `container_commands` and not `commands`, to ensure it is run after the application is extracted-- after all pip can't install requirements if requirements.txt doesn't exist yet.
6. Install node packages and create production build
We will use a predeploy hook to run `npm install` and `npm run build` so that they are run after the application is extracted but before it is deployed.
During deployment, the container_commands will run followed by any executable files in the /.platform/predeploy directory. So to set up the predeploy hooks, you will need to add a script to the /.platform/predeploy directory and then write a command in container_commands to make them executable before they are run:
1. Create script to run npm install: /.platform/predeploy/01_build_frontend.sh
2. Add a command in container_commands in django.config to make all hook files executable
7. Serve Static Files
To do this, we must:
1. Set STATIC_ROOT in djangoproject/settings.py. This setting decides which directory static files will be sent to when collectstaticfiles is run (in this example the "static" directory):
2. Create another predeploy hook to run collectstaticfiles, which will put all the static files in the STATIC_ROOT directory: /.platform/predeploy/02_collect_staticfiles.sh
3. Update option_settings in django.config so that the nginx server knows which directory to go to to find the static files (should be same as STATIC_ROOT directory):
8. Allow your EB environment to serve your Django app
- Find your CNAME by typing the following into the command line from your project directory: eb status [environment name]
- In djangoproject/settings.py add your CNAME to ALLOWED_HOSTS. Should look something like:
ALLOWED_HOSTS = ['localhost', 'env-name.region.elasticbeanstalk.com', ]
9. Deploy your changes
Commit your changes, deploy them to your environment and open your app in browser.
- git add .
- git commit -m "set up elastic beanstalk deployment process"
- eb deploy [environment name]
- eb open
Conclusion
Hopefully by now you have been able to deploy a working version of your app to elastic beanstalk! Thanks for reading along :)
Feel free to leave me a comment to let me know what you thought of this article. Thank you!